Quick Finder:
Who’s who | Progress calendar | Description | Kuraoka Family
homepage
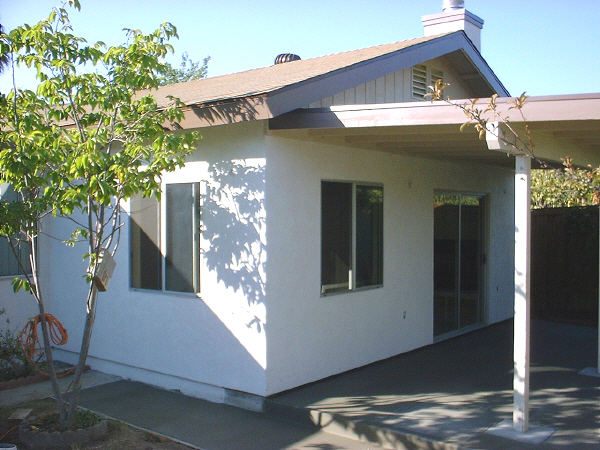
Our room addition was simple: a family room and office space at the
back of our house; a single room replacing an existing covered patio. You can learn more
about our room addition by clicking on (or scrolling down to) “description.”
The “progress calendar” documents the building of our
room addition, with regular journal entries (many months have daily diary entries) and
occasional photos. If you’re thinking of having a room addition built (or building a
room addition), you may find our experiences helpful.
As this construction project drew to a close, we realized something incredible: we
regret none of our choices, a far cry from the usual remodeling experience we
read about. For that reason alone, our room addition is worth reading about.
Who’s who:
John, Ondine, Roy, and Leo: us! Roy is an active toddler, who turned two in June 2002.
Leo was born in the middle of all this, in mid-July. John works at home; Ondine is a
stay-at-home Mom right now. So, we’re watching our room addition be built on a
day-to-day basis.
Thomas Boehm: Our electrical contractor, (858) 274-4872. License #808940.
He came to us via R.W. Smith, after the first electrician flaked out. Tom handled the
whole-house electrical upgrade we needed in order to have enough power for the room
addition. He has been very patient and professional, and, he’s a friendly,
communicative person.
Jim Quinn: Our draftsman, (858) 273-5614. He came to us via R.W. Smith, our
contractor. Jim did a good job shepherding our room addition plans through the city. We
can’t imagine anyone being able to navigate the various departments and floors any
better, and he did find us a Title 24 engineer who managed to get a baseboard heater
approved - an unheard-of accomplishment according to the city plan checkers.
R.W. Smith: Our contractor, (858) 274-3833. License #349042 HIC. He came to us as a
referral from one of John’s business associates. We viewed several videotapes from
the library on choosing a contractor and having a room addition built. In addition to
R.W., we interviewed five local contractors listed in the San Diego Better Business Bureau
directory. We selected R.W. largely on the strength of the personal referral and the fact
that he actually does the work himself. We’d recommend him without hesitation: he is
meticulous, fast, smart, and reliable.
Back to top
2002 Progress Calendar
Back to top | January | February | March | April | Start, April 19 | May | Permit,
May 16 | June | Mid-June | July | Mid-July | August
| Mid-August | September | Final, September 16 | October | Current entry
August 17, 2001: We sold our rental property (John’s old house) and made a small
profit on the sale (John had bought at the top of the market ten years ago, hence the
relatively small profit). Still, to us, this is a sizeable chunk. We allocate one chunk as
a nest egg, and another chunk to go toward a new room addition to the house we’re in
now. We start doodling with graph paper and masking tape outside, figuring out what we
need. We look at, and discard, the notion of a sunroom.
Friday, January 18, 2002: R.W. Smith came by to discuss our plans
for the room addition. He brought with him a draftsman, Jim Quinn. Jim Quinn is also a
general contractor. Over the next week, we interview several contractors, all of whom we
got from the San Diego Better Business Bureau’s directory. Estimates range from
$20,000 to $25,000, with one exception who is around $45,000 because he wants
to repitch our entire roofline. R.W. Smith is not listed, but carried a strong
referral from Glenn, one of John’s friends. We have our rough floorplan on graph
paper for the contractors to review.
Thursday, February 7: Jim Quinn, who will serve as draftsman on
the project, came by to take measurements and discuss plans for the room addition. His fee
is $900 plus $200 for the city permit fees. We don’t even know if we can afford to
build the addition, since we’re working with a fixed budget, and it seems the only
way to find out with any assurance is to go ahead and have plans drawn up and permitted.
Then, whoever we choose to build it can base their bid on the plans. We figure we’ll
have to spend the $1,100 for plans and permits and make a decision based on the estimates
we get after that.
Saturday, February 16: Jim Quinn dropped off initial drawings for our review. Based on
those drawings, R.W. offers a rough estimate of $25,000-$30,000; we are somewhat taken
aback. We also hear from a neighbor (who was doing a lot of remodeling) that they had
considered adding on but they didn’t want to trigger a property tax reassessment. We
did some quick mental calculations - the house down the street from us sold last year, in
a matter of days, for $250,000, so the increase in property taxes could be sizeable. We
pondered whether we could afford the after-effects of building any kind of room addition,
and considered ways to make do without it. Later, we went online to the county tax
assessor’s website, and learned the truth: the new room addition (and only the new
room addition) is assessed and its market value is added to the existing property
assessment, but no total reassessment is triggered. We breathed a sigh of relief;
at the same time, the discussions about whether to build a room addition at all were
enlightening. We move forward with greater confidence.
Friday, February 22: Jim Quinn dropped off revised drawings for our review. He tells us
the permits will only cost about $100, so the total for plans and permits will be $1,000
instead of $1,100. Also, at some point this week or earlier, we decided to go with R.W.
Smith, based on the personal referral.
Back to Progress calendar
Thursday, March 7: Jim Quinn came by with complete set of drawings
and forms for us to fill out and sign. We also give him a check for $100 made out to the
City Treasurer to cover the permit fees. Intended plan check date with city: March 12. One
new odd thing: no matter how Jim tries, he can’t square the measurements of our
actual lot with the city’s recorded lot size, even with the drainage easement, unless
our property includes a few feet of the lot behind us (and beyond the easement) as well.
Tuesday, March 12: Plan check with city. Jim Quinn takes the blueprints to city –
the city requires a few changes, described as “minor.” One of the changes
involves moving the windows even further from the corner. Another change involves
something called “shear paneling.” Shear paneling is a structural component that
presumably makes the whole new room addition more-stable in an earthquake. Usually, you
need a few pieces of shear paneling in each exterior wall. In our case, the entire room
addition will be virtually armored with shear paneling - nearly 100% coverage. If The Big
One ever hits San Diego, come on over and stand under our new room addition. It’ll be
the last thing left standing. An odder issue is the “hillside review” that needs
to be done for the “hill” at the back of the house. There is no hill; just a
drainage ditch. The city’s maps show a hill, though, so a hill exists no matter how
hypothetical. This triggers a chain of events that ends with some sort of waiver. We never
find out if anyone from the city actually looked at the “hill.”
Saturday, March 16: We learn that the type of heaters we have in our house - strip-type
resistance heaters (they work like a toaster) - are no longer allowed in California.
We’re told that we have no choice but to install a much more-expensive
high-efficiency electric heater or a central gas system. Our house is all-electric. We
almost never run the heaters anyway, so the heater, high-efficiency or not, is simply
throwing away money. The estimate from R.W. is creeping upward - now it sits at about
$28,000. Once again we question whether we can afford the room addition, as it appears to
be stretching the budget as it is. We keep looking at the chunk of money we have allocated
for the addition, and thinking of other things it could buy. A lot of vacations,
that’s for sure. Or a huge start on college funding for both kids. We even reconsider
a sunroom, coupled with some new furniture to create an office space.
Wednesday, March 20: We hear from Jim Quinn that our new room addition can
have the same electric strip heaters that we have throughout the rest of our all-electric
house. These heaters are not particularly energy-efficient, but we never use them anyway
(which makes them very energy efficient). We always just bundle up in sweaters.
Friday, March 22: Jim Quinn dropped off the original pencil plans for the room addition
with us. More meetings with city planned for next week, but they’ll be looking at
blueprint copies.
Monday, March 25: We have an estimate from R.W. Smith ($31,500, not including a new
electrical panel should that be required - and we think it will be), and an approximate
timeline that has the whole room addition completed in late August, which
seems optimistic. Still, we’ve heard that R.W. works fast.
Friday, March 29: We learn that the city wants a Title 24 report, an energy efficiency
report that costs $200, in order to approve the electric heaters we want. Otherwise, the
city can require that we install a gas or high-efficiency electric heating system costing
hundreds or even thousands of dollars more than the simple electric strip heaters that we
have throughout our entire house. We have an all-electric house, but there’s a gas
stub way out in front, so as far as the city and SDG&E is concerned we “have gas
service.” It’s up to us to either install gas or pay $200 more and consider it
an added fee to approve a non-standard heater. Again - this is for a heater that will never
be used, because none of our heaters are used. When it’s cold, we
simply dress warmly.
Back to Progress calendar
Tuesday, April 2: Jim Quinn came by in the morning to take
additional measurements of our house and existing windows for the Title 24 report. This
report is required for the city to approve the older-style electric heat for the addition.
In connection with having our taxes done, we did a final reality check on our finances to
make sure we can handle the expense of the room addition.
Monday, April 8: We learn that our Title 24 report has been finished and
approved, and Jim plans to take everything to the city for final approval early this week.
The heater is now two heaters. So there will be two heaters and a fireplace in this 12 x
20-foot room that has two to three times better insulation than the rest of our house.
Sigh. At least the Title 24 is done. We decide to do this separate journal for the room
addition. We may add photos as things start to happen worth photographing.
Tuesday, April 9: We meet with Jim Quinn to sign the Title 24 report and
pay the $200 fee. The report is 21 pages long, and has a lot more calculations and tables
than we expected. Jim expects to get permits early this week. We call R.W. Smith, the
contractor, to give him a status report and advise him that we’ll soon have permits
and be ready to move forward. Then, we take time to review the Title 24 report - and find
mistakes! Most notably, the heaters are sized to handle the room addition with
single-glazed windows instead of the dual-glazed windows we have specified. Also, our
water heater is noted as “gas” when it is, in fact, electric. We call Jim, who
calls the engineer. He’s not sure how these errors will affect the calculations. It
doesn’t sound like he’ll be able to take the report and plans to the city this
week.
Thursday, April 11: We hear from Jim Quinn in the afternoon. The engineer who did
the Title 24 report must recalculate everything, so we’ll have a clean corrected
report when Jim goes to the city for permits. The corrections make no difference on the
heater requirement, which strikes us as odd since dual-glazing is supposed to
make a difference. Maybe the addition doesn’t have enough of it to matter. At any
rate, it looks like we’ll get our corrected Title 24 report in the next couple days,
and Jim may be able to go to the city next week.
Friday, April 12: We hear again from Jim, our draftsman. The corrections we caught
cancelled each other out in that the dual-paned windows will make up for the fact that we
have an electric water heater - so, no difference on the heater requirement. Jim will
retrieve the corrected Title 24 report next week, after which we have to sign it, and then
he’ll be ready to take it to the city for approval. Looks like we may have permits
late next week ... we may break ground in April yet, although we have not heard back from
R.W. Smith, our contractor (we called him on the 9th).
Sunday, April 14: We hear from R.W. Smith, who was out of town all last week.
We’ll meet shortly after the permits are issued, to go over the demolition plans and
figure out how to begin.
Tuesday, April 16: R.W. Smith calls - he will come by tomorrow morning to look over the
job site and figure out how he’ll proceed.
Wednesday, April 17: R.W. Smith, our contractor, came by in the morning. He says he can
start the demolition work ahead of the permits to save time, since once the permits
are pulled he can call for inspections. He estimates that he has at least two weeks of
demolition and digging work to do before any real construction can start anyway, and the
windows will take up to three weeks to be delivered after we order them. We discuss some
minor changes to the plans that will help speed things along. For instance, it could save
2-3 weeks if the triangular part of one wall above the patio canopy is T-1-11 wood siding
instead of stucco, so he can do that work himself and anchor and build out the patio
canopy without waiting for the stucco person to finish working. It also becomes a smaller
job for that outsourced bit. R.W. thinks he will end up doing a lot of the concrete work
himself, since the concrete contractors he talked to seemed reluctant to commit
to such a small job. One challenge will be finding room to work outside, because the
addition will take up one chunk of the back yard, the patio another chunk, and the
yardspace that remains is blocked off by fruit trees (plum, fig, orange, peach,
cherimoya). R.W. will come by early next week with a contract, timeline, and we will pay a
deposit then. He estimates completion in a couple months - that’s close to
our due date (yes, in the middle of all this, Ondine is pregnant and due July 9). This
turns out to be very optimistic, mostly due to bureaucratic procedures. Ondine asked him
what would happen if he gets injured, since he does all the work himself. That made him
pause, but he said that he has some people he would trust to keep things moving
forward, and one, a fellow named Keith, will probably work on the project. Later that
morning, we hear from Jim Quinn, who has our corrected Title 24 report and will come by
tomorrow for signatures. Jim thinks he will get permits on Friday or Monday, so R.W.
won’t be beginning work without permits after all.
Thursday, April 18: Jim Quinn came by in the morning to collect our signatures on the
Title 24 report and the front page of the blueprints. He intends to get permits on Monday.
R.W. called, and says he’ll come by tomorrow with a contract and timeline, and will
need a deposit then. He also intends to drop off some tools, so he can get started on
Monday. The project is moving forward!
Friday, April 19: The official start of our project. R.W.
Smith came by in the morning with a contract and some tools and materials to leave in the
back yard. The contract calls for total payments of $31,500 over seven milestones tied in
with City inspections. It does not include an electrical panel upgrade (one lingering
issue that won’t be resolved until the electrician starts work), which could add
another $1,800. We paid R.W. a deposit of $5,500. This is not a recommended
practice! In fact, most books and City hand-outs recommend an inital payment of 10%
or $1,000, whichever is smaller. However, R.W. is not a company (although he is a
licensed contractor with the HIC designation - HIC means Home Improvement Certification);
he is the sole worker, and he needs the money to order the windows and lumber (and yes, we
know that this is exactly what a dishonest person would say too). We let him know
that we knew we were going off the safe and recommended route by trusting him with $5,500
up front. The personal recommendation from John’s friend Glenn is carrying a lot of
weight here. The other thing in the contract, is a release of liability (since he is
a sole worker). If he pulls additional people in, we’ll gather signatures and
releases on a form he has provided. So, R.W. will show up Monday morning, bright and
early, and start ripping down our patio cover. By next Friday, most of the back of
our house will be ripped open. The contract timeline calls for demolition to take 2
to 3 weeks, and construction to take 8 to 12 weeks. We’ve heard that R.W. is
fast and smart. Pretty soon, we’ll get to see him in action.
Monday, April 22: R.W. and Keith are here at 8:15 in the morning, and have the patio
cover disassembled by 9:30. We get a call from Jim Quinn, who is on his way to the City
for permits - apparently the check we gave him for $100 for the city fees (back in
March) was, he says, “supposed to be blank.” Yeah, like we’re going to
give someone a blank check. R.W. and Keith start busting the stucco off the walls. A
wooden shadow box inside falls, breaking some small glass animals. Oops. R.W. comes in and
takes everything off the inside walls, in the dining area and the master bedroom. They
bang pretty much non-stop until about 2 pm, then start cleaning up, making neat piles of
stucco rubble. They make a discovery about our plumbing that is going to complicate things
- the water supply for the back yard runs through the attic, then drops down the wall to
the hose and sprinkler valves. The copper pipe is right where the window will be, and so
we’ll need to have a bit of plumbing work as well. Because R.W. needed to run an
electrical cord out from the kitchen, the patio door needed to be open just a crack. There
is a fine layer of dust over everything in the kitchen. As for us, we make an unwelcome
discovery: we had left the bedroom window opened just a crack, and there is a fine layer
of dust over everything in the bedroom as well, including John’s CPAP machine (which
blows air into his nose to prevent sleep apnea). We clean up as best we can, but we sleep
in the living room on the pull-out sofa. At about 3 am, Ondine (who is six months
pregnant) moves back to the bedroom because the sofa bed mattress is making her ache. Roy
wakes up coughing too, so the dust is truly pervasive.
Tuesday, April 23: R.W. and Keith hit the patio slab at about 8:30 am with a
jackhammer, breaking up two strips around the perimeter where the foundation cement will
have to go down 12”. This takes most of the morning, and saves the expense and time
of hiring a concrete worker with a concrete saw for two 10’ cuts. We have learned
from yesterday, and think to close all the windows. We also tape a strip of butcher paper
over the open part of the patio door, which cuts down dramatically on dust but still
allows traffic and access to the electrical outlet just inside the door. Then, R.W. and
Keith strip the wire and insulation from the exposed walls, leaving just studs and
interior drywall. The only thing between the inside of the house and the outside now, is
painted drywall. They cut the roof eaves flush with the existing wall line. Roy is
fascinated, and pushed his potty to the sliding glass door so he can watch R.W. and Keith
work while he pees. They haul away the insulation and more rubble, and leave around 2:00.
Wednesday, April 24: Rain! The morning is clear and warm, but an unexpected rainstorm
moves in and catches weather forecasters and us by surprise. R.W. and Keith leave to
get plastic sheeting; in the meantime, rainwater begins dripping down the inside
of the bedroom window and patio door. John gets an extension ladder from next door and
starts laying tarps on the roof; Bill comes to help. We get four tarps up, anchored by
chunks of concrete rubble, and that helps. R.W. and Keith show up with apologies and
plastic sheeting, and sheet up the sides of the house. There is still a fair amount of
residual water dripping inside, and the popcorn ceiling in the dining area now has a water
spot. The rain continues for several hours. So today, which dawned clear and bright, turns
into a day of rain, damage control, and sliding backwards. Fortunately, most of the
exposed drywall will be removed anyway. The disaster continues when we
get an afternoon call from our draftsman, Jim, who tells us that because of the Title
24 report, the plan had to be re-submitted to the city. So, not only did he not
get permits on Monday, it could take a couple weeks to get them - if
the plan is approved intact! Suddenly, with the back of our house demolished and
leaking, the planned project is in jeopardy.
Thursday, April 25: Jim Quinn comes by to clarify the situation with the permits.
Everything is approved, he assures us. The hold-up is just a delay in
processing due to the Title 24 report, an unusual, even unheard-of, step in a small
residential remodel. At the city, they kept trying to make him go through the commercial
section with the Title 24 report. Jim assures us that the report is sound and will
be approved intact - that’s the whole point in having the report drawn up. Meanwhile,
R.W. and Keith dig the trenches for the eventual perimeter wall foundations.
Friday, April 26: More rain today. R.W. comes without Keith, to button down the roof a
bit more, check on a few things, move some dirt away from the patio, take away more
rubble, and buy some steel rebar and 6x6 steel mesh which are now stored on the back
lawn. The steel mesh will be part of the foundation. He also takes a few minutes to help
us pull up a bit of carpet in our bedroom where it feels damp. We want to avoid mildew, so
we have the fan blowing full blast. It is cool and drizzly/rainy for most of the day. R.W.
asks us where we want the dirt that is being dug for the foundations; we’re not sure
what to do with it, but it sure seems like a lot of dirt. It is pretty good soil,
actually, although quite rocky. R.W. tells us that if the weather is warm on the
weekend, he may come by to stick the roof down a little better.
Saturday, April 27: The weather is sunny, and we are somewhat surprised to see R.W.
moving around in our back yard by late morning. He does a couple hours of work on the
roof, then leaves as quietly as he arrived. The weekend is warm and sunny, but rain is
predicted for later in the week. John’s Mom, Frances, is down for the weekend, and
sees the work for the first time. Also, we ask our neighbor across the street, John Hanna,
if he wants some fill dirt, as we have several piles that we don’t know what to do
with. Mr. Hanna says he can use some, and Sunday evening he and John sift and
remove four barrowfuls, which helps a lot.
Monday, April 29: R.W. arrives without Keith at about 8:30 am. At first, we think Keith is
back there with him, but it turns out that he just talks to himself and the radio as he
works. He sets to work breaking out more stucco, following a copper pipe down the
wall. This pipe is the water supply for the back yard, and will need to be moved to make
way for the new bedroom window. In the evening, Mr. Hanna comes and removes more dirt.
Tuesday, April 30: R.W. tells us not to give away any more dirt! He is concerned about
having enough to do the leveling. He removes the top layer of turf from the area that will
become the new patio. He also continues prepping two areas for new windows.
Back to Progress calendar
Wednesday, May 1: R.W. brings a plumber, who relocates the copper
pipe in the outside wall. R.W., meanwhile, continues getting ready to move the bedroom
window down several feet. He removes the security grate. We can see daylight through the
bedroom wall now.
Thursday, May 2: R.W. preps the bedroom window area, and also roughs in the frame for
the new window into the dining area. He also removes a lot of turf.
Friday, May 3: R.W. finishes the framing of the new window into the dining room and
cuts out the hole. Then, he carefully screws back in the section of drywall as a temporary
cover. He also cuts all his lumber pieces for the bedroom wall, including the large
headers that will go over the window and sliding pocket door, so it’s all ready to go
once the wall is completely opened up. John talks to him and learns that Jim Quinn, our
draftsman, has an appointment with the city next Tuesday - so we should have our permit
then. He sifts some dirt.
Monday, May 6: R.W. is here with Keith. They’ll be working in our bedroom today,
so we move our bed to the opposite wall. They build a temporary inner wall in our bedroom
to hold up the roof and keep out the dust, drape it in plastic, then open up the bedroom
wall completely. They heft the heavy headers into place and frame in the space that will
be the new window and pocket door This is the longest day they’ve worked, from
about 8:30 to about 4:00 straight through. When they leave, we’re surprised to find
the bedroom wall completely closed in again, the old window is in the new window frame,
and R.W. has screwed a cover over the doorway opening. Outside, the wall insulation is
applied and a cover of plastic sheeting is tacked to the studs so the room is
weathertight. After they leave, we find that some switches and plugs aren’t working,
and figure they may have left a circuit off.
Tuesday, May 7: R.W. is here alone today. We ask about the electrical, and R.W. is
puzzled. He backtracks along and finds a break in the wire. Once that’s re-connected,
we have full power again. He puts more insulation in the walls, then begins building the
forms for the concrete. We hear from Jim Quinn, who tells us that all our
paperwork has sat in the wrong department (the commercial side, instead of residential) at
the city for the past two weeks. Even though it was their mistake, the city is in no hurry
to move things along at all, he says. John talks to R.W., who is puzzled again at why
things are taking so long. The plan check fees alone are $345, and the permit fees will
probably be another $300 - almost double Jim’s initial estimate. We come to the
conclusion that the city system is, in Jim’s words, a morass. We call the city,
and after an hour of being either on hold or having the phone system hang up on us after
being on hold for 20 minutes, we get a callback from someone who tells us that
there’s no routing information attached to our record at all. Not even a
plan checker (even though we have a plan checker’s signature on the plans).
Apparently the Fourth Floor (review) has no connection with the Third Floor (permits)
besides the elevator. We leave a message for the supervisor of the Fourth Floor asking
about a timeline. The day ends with no one knowing what, exactly, will happen. At best,
there will be a delay in which no more work can go forward.
Wednesday, May 8: John calls the Fourth Floor supervisor in the morning, figuring
he’d might as well leave a second message asking about a timeline. R.W. works more on
the concrete forms, and digs the holes for the piers that will support the patio roof. We
have an anxious moment when the company that did the Title 24 report calls and wants to
know when they’ll receive payment. John gives them Jim Quinn’s phone number,
then calls and leaves a message for Jim himself - we had visions of the whole lien
nightmare happening and having to pay for the Title 24 report twice. Within minutes, Jim
calls back - says he chewed out the Title 24 guy, who chewed out his secretary, who called
back to apologize. They had been paid after all. The day goes by without hearing
from the city.
Thursday, May 9: We take a holiday - and the city calls. Yup, we get a message from
Brad on the Fourth Floor, saying on Tuesday he’ll be checking the mechanical part of
our plans for our house at 4430 Newport Avenue ... he has the wrong address! Who
the heck lives at 4430 Newport? Not us! Sigh. We leave a message for Brad. Meanwhile, R.W.
does more work on the steel rebar foundation reinforcements, and digs up a
weedy flower bed where another patch of concrete will be poured. He is on a quest for
fill dirt now.
Friday, May 10: We hear from Brad at the city, who assures John that our plan number,
address, and name are all correct, and that the other address he gave in the phone message
yesterday ... was something else. Brad also notices to his surprise that there is no
routing information on our plan, even though it has a couple sign-offs and he received it.
John says yup, we heard about that ourselves on Tuesday; it’s all very strange. Brad
tells John that he’ll attach routing information to it, which will "make it look
more normal." Brad sounds pleasant and intelligent, and is very helpful - a relief.
R.W. shifts more fill dirt, then goes to El Cajon to pick up our windows, which were
ordered a couple weeks ago. He returns in the afternoon with our windows and sliding door.
Monday, May 13: R.W. installs two windows; one in our dining room and another in our
bedroom (replacing the old window which he had tacked in as a placeholder). We opted not
to get newfangled vinyl windows, and instead matched the look of our existing
clear-anodized aluminum frames. The new windows are dual-glazed low-E windows from Window
Master in El Cajon, and transmit very little heat. Unlike our old windows, the new ones
slide on nylon rollers - very smooth and quiet. The dining room window already looks like
it should have been there all along. R.W. installs the bead around the window and
applies one coat of mud (plaster) is applied. He also applies one coat of mud to the screw
heads in the bedroom drywall.
Tuesday, May 14: A second coat of mud (plaster) is applied around the windows and on
top of the screw heads in the interior drywall. We hear from Jim Quinn, who says that the
city called him with a mechanical approval. That means that our heater - which got the
whole Title 24 thing going - has finally been approved. The next step is that Jim will
pick up a check from us, made out to the City Treasurer, then he’ll go down to the
city for an over-the-counter plan check. He should get the permit at that point, at which
R.W. can call for an inspection and order concrete.
Wednesday, May 15: Jim comes by in the afternoon to pick up a blank check made out to
the City Treasurer. He has an appointment for the 20th, but will go down tomorrow and
stand in line for an over-the-counter plan check. R.W. tidies up the job site because
there’s nothing more he can do until he has a permit.
Thursday, May 16, we have a building permit!
This is the first day R.W. doesn't show up at 8:15 in the morning. In the afternoon, we
get a call from Jim Quinn with our permit number: C303270-02. Permit fees were $466.43,
making the total cost of the permit about $1,000 in addition to Jim’s fees of about
$1,000. A $2,000 piece of paper. Jim says the the city plan checker told him that it was
the very first time he’d seen anyone get a resistance-style baseboard heater
approved. So, our team was the right team after all. John immediately calls R.W. with the
permit number, who calls the city to arrange a foundation inspection for Friday.
Back to Progress calendar
Friday, May 17: R.W. spreads and compacts a 2" layer of fill dirt over the
existing patio slab, then lays the steel mesh on top of that. The fill dirt will
absorb some of the moisture from the concrete when it gets poured, so the results will be
better. He also does some other finishing work - he wants the inspection to be an
easy approval. Jim shows up with the stamped set of blueprints, the official permit
sign-off card, and some other documentation. We write the last check to Jim, then turn
over all the paperwork to R.W. In the early afternoon, an inspector shows up. By this
time, R.W. has the place looking so buttoned up that the inspector can tell at a glance
it’s a good job. He takes one measurement - the side clearance, signs off on the
foundation, and is gone in less than ten minutes. R.W. says that if he knew ahead of time
that the inspection would go that easy, he’d have set up the concrete pour for
Monday. As it is, the concrete will have to be poured after he gets back from his
week-long vacation.
Saturday, May 18: John is alone with Roy for the weekend. Roy is eating lunch when
suddenly we realize that R.W. is in the back yard, with some men. It turns out
they’re Paul and George, the concrete contractors - R.W. likes for everyone to see
the job site. They make a few suggestions (John stays in with Roy, but can hear some
discussion). Roy seems to enjoy the show. After Paul and George leave, R.W. moves in a
load of lumber.
Monday, May 20: R.W. cuts some lumber in preparation for the framing work, then makes
sure everything is battened down and tidied up before leaving on his annual vacation to
the Indianapolis 500. He will return next Wednesday; the concrete pour is scheduled for
next Thursday, ten days away.
Wednesday, May 29: R.W. builds a temporary wall in the kitchen to keep the dust out of
the house. He re-uses our sliding glass door and finishes the wall with drywall, so the
dining area just looks mysteriously smaller until you notice that the new window is cut in
half and there’s a strip of linoleum outside the door. He also checks his forms,
installs foundation bolts and other fittings, and does other prep work for the concrete
pour.
Thursday, May 30: R.W., George, John, and someone else show up early to finalize
preparations. A pumper trailer is set up. The pump is a GM 6-cylinder engine attached to a
mechanical pump. The cement mixer truck arrives at about 10 am. The concrete comes out of
the rotating barrel of the cement mixer, down the chute into the hopper of the pumper
trailer, then through a series of big hoses to the back yard. They fill the foundation
footings first, then work their way around to the slab itself. The footings for the patio
come last. Then, they “float” the concrete, leveling it out and eliminating
air bubbles. A few hours after everyone has finished and left, R.W. comes back to spray
the new slab down with water. This makes the concrete cure slower, for increased strength.
We are lucky with the weather, too; the weather reports predicted temperatures in the 90s,
but it’s in fact cool, overcast, and even drizzly at times.
Friday, May 31: R.W. starts framing in the room. John helps him erect two walls.
It’s neat to see how it works: the wall goes upright balanced atop the anchor bolts.
Then, R.W. goes around with a hammer whacking the wall so the holes line up with the bolts
along one dimension. Then, he goes to the end of the wall, and with one whack of the
hammer the whole wall drops neatly into place on all the bolts. Before he leaves, he
sprays the concrete with water.
Back to Progress calendar
Saturday, June 1: John and Roy return from swim class and grocery
shopping to find R.W.’s green Ford pick-up in the driveway, lumbered with lumber
including 20’-long spans for the ceiling joists. R.W. lets Roy hold his hammer while
he chats to John about some minor design changes to make the roofline come out even. Then,
he finishes and erects a third section of wall, and wets down the concrete before
leaving.
Monday, June 3: R.W. finishes the third wall, the one that will have a sliding glass
door going out to a patio. He puts up the ceiling joists. We don’t know how he
managed to lift the 20-foot long spans in place single-handed, but there they are. With
all the walls and the ceiling now framed in, we can really get a sense of the room.
Tuesday, June 4: The main roof beam is up, supported at both ends with 4x4s. This is
the beam which will carry the new peaked roof. The ceiling joists are reinforced along the
centerline. Finally, a top-of-the-wall header is installed on all three walls, which will
raise the roofline about nine inches, so the eaves of the new roof will match closely with
the existing flat roof trim. A note about noise and dust: it’s not bad, thanks to the
temporary kitchen wall R.W. built last week.
Wednesday, June 5: Payment #2, for $4,250. This payment was scheduled to have been $4,500,
but R.W. saved $350 on the concrete work so he gave that back. But, the additional
plumbing (to re-route the copper pipe coming down the wall) was $100, hence the $4,250.
R.W. continues work on the roof.
Thursday, June 6: R.W. erects the beam that will carry the peak of
the “California Fill” section of room - the part of the peaked roof being
raised over the existing flat roof. He also begins scraping away the gravel on the flat
roof in preparation for the new roof, a laborious chore. In the afternoon, he makes a
lumber run, and parks more lumber on the roof and stacked neatly in the yard.
Friday, June 7: We agree to pay an additional $75 to have the gravel scraped off the
existing flat roof. It could just stay there in what will be the attic, but we decide to
have it removed. We discuss laying plywood over the joists, so we’ll have some
storage space. R.W. also clears the shingles from the peaked section of roof where the new
roof will join it. The shingles look to be in pretty good shape. He begins attaching more
ribs to the peak of the California Fill.
Saturday, June 8: R.W. drops off more lumber, stacking sheets of plywood on the roof.
He puts up the last of the rafters that will carry the California Fill section of roof -
the peaked part that is being built over the existing flat roof.

Monday, June 10: A fairly quiet day as R.W. trims, then paints the rafter tails with
a white primer. More work on the roof as well. Above, you can see how there’s the
addition roof, then the California Fill going over the existing flat roof. Below, you can
see how the new peaked roof will fit into our existing roof.

Tuesday, June 11: More work on the roof. The vents that go between the rafters are an
issue, because the prefabricated ones are out of stock. R.W. tries to make a set himself,
but finds that drilling the large holes through 2x6s wears down drill bits at the rate of
a bit per hole. He decides to try some other resources for prefabricated roof vents. We
definitely want as much ventilation as possible because we do plan to use the attic space
for storage.
Wednesday, June 12: R.W. makes a lumber run and comes back with long fascia boards
and prefabricated roof edge vents. Not only are the vents pre-holed, they’re
pre-screened and pre-painted. He installs them all along the edge of the new roof, one
every other rafter bay. That, in combination with rooftop vents, will make for excellent
ventilation. We look at the prefabricated vents, and consider having an additional layer
of fine mesh screen put behind the heavy mesh screen, because as it is the mesh is just
the right size for bees and wasps.
Thursday, June 13: R.W. is here with Keith, and it’s a big hammering day. An
air compresser is running and the whole roof is shaking. They are installing the
fascia boards. No, wait ... when they leave in the afternoon the entire roof is sheathed
in plywood. We now have a solid roof up. We discuss with R.W. adding some screen to the
prefab vents.
Friday, June 14: R.W. adds finer-meshed screens to the roof vents, adding that doing
so will cut down dramatically on air circulation. We discuss adding a roof turbine, which
we had considered earlier anyway. (John had two installed at his old house, and they made
a big difference.) R.W. calls the city for a framing inspection. Two weeks ago, this
was just dirt and trenches. The picture above shows how much has been done. See how the
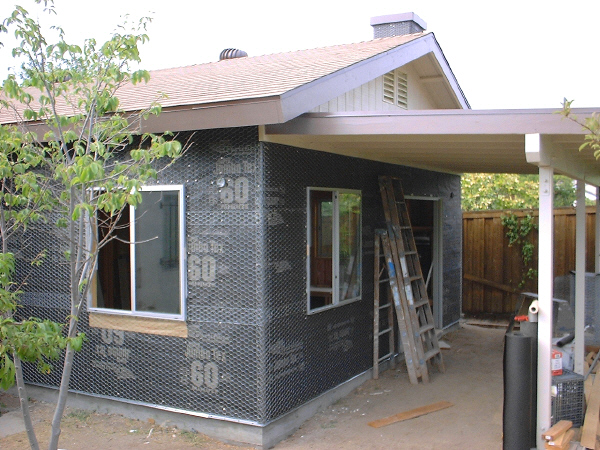
entire back wall is clad in shear paneling?
Saturday, June 15: R.W. paints a stack of wood that will become the fascia boards near
the peak of the roof. See the entry for April 17 to see what this is for.
Sunday, June 16: We go to Lowe’s, a home improvement warehouse store, to look at
floor coverings. We choose a linoleum for the kitchen, an Armstrong Solarian (15-year
warranty) that looks somewhat like bluish-gray and tan slate. We also choose a
hardwood-like floor covering for the living room and hallway, an Armstrong SwiftLock
product (25-year warranty) that looks like pine. We like these products both singly and in
combination. Both look good with our kitchen cabinets and countertops (1970s yellow). The
key factor is cost: the hardwood-like floor is more than twice the cost of the linoleum.
Monday, June 17: The inspector comes, and wants some stuff
that isn’t on the plans, including either a 4x4" post to carry the main roof
ridge directly, or replacing an existing 4x8" header with a 4x12". The
4x4" post will make the opening between the dining room and the addition about
7" smaller. We opt for replacing the header, since this allows us to enlarge
the opening by nearly two feet. The inspector also wants to see the patio cover framing,
since it’s on the plans. R.W. points out that, at that point, the patio cover is
practically finished. That also pushes back the final framing inspection. The good news is
that the inspector seems unfazed by the electric baseboard heater that’s specified on
the plans. R.W. and John discuss the fireplace and window seat - the fireplace that
was specified on the plans may not be the best fit now that we can see the space
we’re working with. Likewise the two lighted ceiling fans we have in the plans - we
think one may suffice. We discuss adding a pull-down attic ladder and
solar-powered attic exhaust fans. R.W. goes on a lumber run. John and Ondine discuss the
floor coverings further and do some quick and rough math. R.W.’s estimate
includes an allowance of $1,440 for flooring (just for the addition) Doing the
addition and the kitchen in the hardwood-type floor will cost about
$3,000; in linoleum, about $1,400. We also want to do the living room and hallway in
the hardwood-like flooring, which will be a bit over $2,000.
Back to Progress calendar
Tuesday, June 18: R.W. brings in several loads of lumber. Then, he knocks out the old
4x8" header that used to be over the patio door, and replaces it with a massive
4x12" header. He also extends the opening nearly 20 inches. The new header, despite
being bigger, permits about an inch of additional height under the beam. Also, we add
photos above, starting at April 29. Below is a photo of the new, enlarged opening between
the old dining room and the new addition. The sliding door is part of the temporary dust
wall. Ondine is 37 weeks pregnant here.
Wednesday, June 19: R.W. brings in Marty, the fireplace guy, and Mort, the electrician,
both of whom show up in the afternoon. We make a lot of decisions today. Fireplace first:
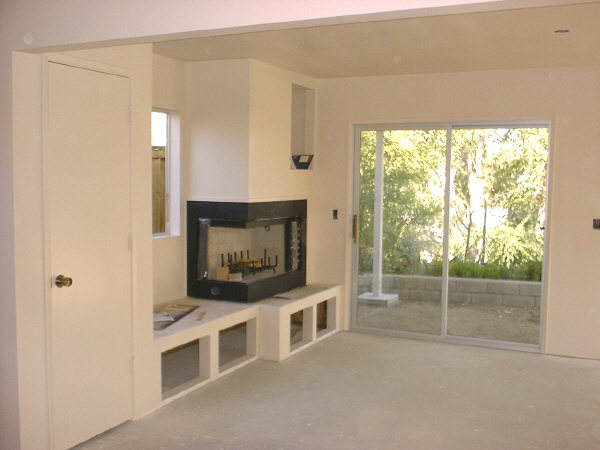
we stick with our original plan of having a two-sided corner fireplace atop an elevated
hearth. That will make the exterior chimney tower nearly 12 feet over the roof, but
that’s the way it goes. We want the elevated hearth so we have storage under and a
nice window seat. The fireplace, at 26" deep by 42" long will take nearly 8
square feet all the way up to the ceiling; it’ll definitely dominate the room! Next,
electrical. We’ll have a new sub-panel fitted, with four or five new circuits:
heater, computer/office, interior lights, exterior lights. The final circuit will be used
in the kitchen, to stop our microwave from constantly tripping the existing 20-amp
breaker. We discuss minor changes: one ceiling fan/light instead of two, a new reading
light over the window seat, switch positions, a new light in the existing dining room, and
five exterior lights (we eliminate one light, near the bedroom window). Whew! A lot of
decisions. We also discuss with Mort the fact that we want most of the outlets in our
house replaced; they hold plugs too loosely, a common fire hazard. R.W. wants to get
things moving even faster, so they’ll be working Saturday. Meantime, R.W. paints some
lumber and rough-fits one window which you can see below. The fireplace will go in the
corner on the right, where the bucket and broom are.
Thursday, June 20: R.W. installs the windows and additional cross-braces for the roof.
Then, he starts building out the patio canopy, since the building inspector wants to see
that before signing off on the framing. Normally, an inspector wouldn’t bother
looking at a patio, but this patio is part of the plans so it must be signed off
on. Today, R.W. gets the three main uprights and beam erected.
Friday, June 21: An inspection. The building inspector signs off on a line saying
it’s OK to wrap and cover, meaning the black paper wrap. R.W. continues work on the
patio cover, installing the rafters which tie into the house. He also begins to wrap the
addition in the black paper (which isn’t ordinary paper, but a fiberous, weatherproof
paper). Finally, he opens up more wall leading into the kitchen, for the circuit to power
our microwave oven and coffee maker. He establishes the position of the pull-down attic
ladder we want.
Saturday, June 22: Electrical work with Mort and his assistant, Mike, in the morning.
We get a new sub-panel in the garage to power the addition plus the back of the kitchen -
we had thought we’d need a new 200-amp service to the main box, but this sub-panel is
apparently enough. R.W. works on the patio canopy, and paints the fascia of the addition
dark brown to match the rest of the house trim. He has a suggestion - which we take - to
leave the patio cover square (the plans called for it to follow the curve of a flower
bed). Upon actually seeing it, we realized that it would look funny that way, and is much
improved by leaving it square with the house. The electrician says he’ll return on
Monday.
Monday, June 24: More work on the roof. The electrician, Mort, calls to postpone
until Tuesday. His assistant, Mike, shows up and looks at various electrical outlets we
want to replace because they hold plugs too loosely.
Tuesday, June 25: R.W. and John discuss the roof, turbines for
ventilation, and the chimney; we decide on two to three turbines and a stucco finish
for the chimney. The chimney doesn’t have to be as tall as previously calculated;
just 8 feet or so above the roof. R.W. frames in the fireplace and bench seat, then cuts
the hole for the chimney, while Mort and Mike (electricians) show up in the afternoon to
finish the wiring. They’ll be back after the room is nearly finished, to install
receptacles and fixtures. We’ll have Mike re-do most of our electrical outlets in the
meantime, his estimate of $160 is not part of the addition but it’s something we want
to do for safety reasons. Loose plugs are a leading cause of fires in houses of this
vintage (1970s), since they are simply wearing out. Mort discusses receptacles with John,
recommending strongly against the cheapest ones. We decide to go with the standard ones.
Mike will be back tomorrow afternoon to start replacing receptacles.
Wednesday, June 26: This morning, a flatbed truck pulls up in the driveway, extends a
conveyor belt up to the garage roof, and starts sending large packets of roofing materials
up. One man loads the conveyor belt on the truck; another man takes the packets off the
belt and stores them on the roof near the work area. R.W. brings in three turbine vents in
brown. Then, he and John discuss the upper fireplace framing; R.W. is concerned
that it’s too big in the room, and thinks he may be able to make it an inch or two
smaller depending on the actual fireplace unit. We also discuss the possibility of using
some of the dead space in the upper frame for a storage cabinet. We need all the
storage we can get. R.W. puts the patio roof up, or at least the underside of it, which is
finished in painted T-1-11 wood siding. He also pre-cuts and paints the wood siding for
the triangular area of wall above the patio cover. Marty, the fireplace guy, comes to look
at the fireplace framing. He will have someone out tomorrow to install the fireplace
itself; once that’s done, R.W. can see about squeezing in some additional
storage cubbies. Mike calls to postpone his electrical work until tomorrow afternoon.
Thursday, June 27: Work on the patio roof and the fireplace framing. Mike comes to
begin replacing all the electrical receptacles in our house, about 27 of them. He’ll
also replace the outlets in the bathrooms and kitchen with GFI outlets. When he goes to
replace the 220-volt dryer outlet, we have an unpleasant surprise: it is completely melted
and charred. It’s not just a fire hazard, but there’s evidence that it did at
one time catch fire! It looks fine from the outside, but you can see the inside of the
outlet and the dryer plug below. Behind the outlet are melted aluminum wires. We need new
wire run - copper - as well as a new cord for our dryer. We feel very fortunate to have
caught this in time!

Friday, June 28: R.W. does more work on the roof and patio. In the photo above, you can
see the patio roof, as well as the rough framing for the chimney. Note the fascia boards
at the eaves, which will give a finished look to the undersides. Also, note the T-1-11
siding used on the addition wall above the patio roof. That’s also what the underside
of the patio looks like, for a finished look. Atop that, is a layer of plywood, then the
rolled roofing. This is a sturdy patio roof, one that a person could walk on. The
fireplace people show up to take another look at the job. Also, Mike runs new copper wire
to replace the melted aluminum wire that powered the dryer outlet. He then finishes
replacing all the electrical receptacles inside the house. The total cost for replacing 27
receptacles, installing three new GFIs, rewiring the 220-volt dryer outlet, and installing
a new dryer plug and cord, comes to $200 in labor plus about $90 in parts, a small price
to have a large risk eliminated.
Saturday, June 29: R.W. brings more parts, including the pre-hung closet door.
He does more work on the roof.
Back to Progress calendar
Monday, July 1: R.W. rough-frames in the fireplace top, and
firms up the framing on the bench seat/hearth. He does more work on the roof and chimney.
Some painting.
Tuesday, July 2: R.W. does more work on the roof. Note the attention to detail in the
photo above, like the peaklet he built on the uphill side of the chimney box to keep
rainwater flowing away. Most chimneys just have straight flashing, but this is the right
way to do it. You can see the brown metal mounts for two roof vent turbines; a third will
be added to the existing peaked roof of the house. There is the first layer of paper on
one face (note the bright orange nail gaskets for easy inspection). The other roof face,
which needs to dovetail into an existing flat roof, has required more attention to prevent
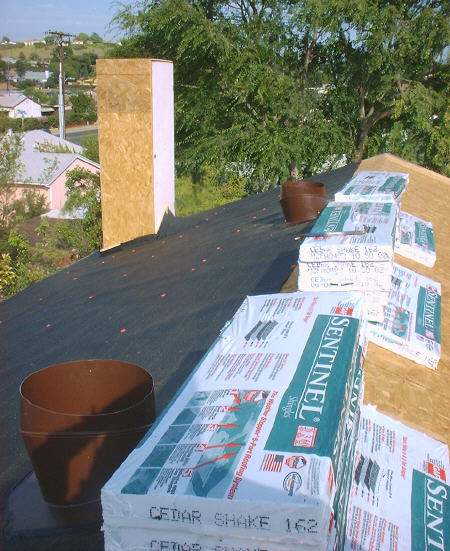
any potential low spots in the flat section of roof. The composite shingles are cedar
shake ... colored.
Wednesday, July 3: More work on the roof. In fact, a roofer was supposed to show up,
but didn’t - so R.W. laid the paper and some composite material himself. The three
attic turbine vents are on and spinning away; the whole house feels noticeably
cooler by late afternoon (when it is normally very hot). Both sides of the roof are
papered, the meeting of peaked roof to flat roof has been neatly adjusted, covered,
sealed, and trimmed, and the edge flashing is on. The fireplace people were supposed to
show up this week, but didn’t (you will look a long time before you find a contractor
as reliable as R.W.), which will push the framing inspection back to next week. Indeed, it
took until today for the fireplace people to locate a fireplace unit. The fireplace needs
to be in place for framing sign-off. Tomorrow is Independence Day, so we think things will
be sort of on-hold until next week.
Thursday, July 4: Surprise! We’re eating breakfast when R.W. shows up to meet
a Victor, a roofer. While he waits, we discuss the roof and insulation schedule.
He also has some new leads on stucco people, and a flooring person for us to talk to.
Then, he moves some drywall into the addition space, and does some prep work to hang the
closet door. Victor shows up (an hour late) and they go up on the roof to discuss what
needs to be done. They both leave around 10:30, with plans to do the roof tomorrow.

Friday, July 5: R.W. arrives at 8 am, and Victor, the roofer, follows shortly after.
Victor immediately begins work on the roof, while R.W. works on the sliding patio door and
closet door. Soon, R.W. starts helping Victor on the roof. By the time they stop work, at
about 5 pm, the addition roof is completely finished. Compare the shot above with the
similar view on June 10, and you can see how far things have come! The mastic strip you
see will be covered by pea gravel.
Monday, July 8: R.W. does some finishing work on the roof, then buys insulation. The
exterior of the house has lath wire on it now to support the black paper. He has the
fireplace installation scheduled for tomorrow.
Tuesday, July 9: The room addition is wrapped in black fiber paper over lath - wire -
or directly over the shear paneling. The fireplace arrived and was installed by Schmidt
Construction, who will also handle the insulation. Because the chimney pipe must go
straight up between two rafters, the fireplace is positioned awkwardly; apparently corner
fireplaces are not sized to sit in the actual corners of actual buildings. In the game of
inches, this is one we lose. By the way, this is one of two Official Estimated Due Dates
for our other new addition, a baby!
Wednesday, July 10: A framing and electrical inspection turns up some small details,
mostly in the electrical. He does, though, get the OK to put up insulation, which he
completes. R.W. calls Mort to have him come back to do the electrical fixes. We discuss
with R.W. the fact that he hasn’t been paid in over a month now (his payments are
tied to inspection milestones) - as small business owners ourselves, we know how that can
stretch the cash flow. We’re confident that we can accelerate a payment to him with
no problem. He assures us that things are OK, although the extras are adding up to about
$1,600 - the roof clearing, roof repair, three turbines, and electrical. So, we’ll
pay that as soon as he can invoice. If all goes well this week (framing and insulation
milestones passed), it could be an $11,600 week for him! The photo above shows the
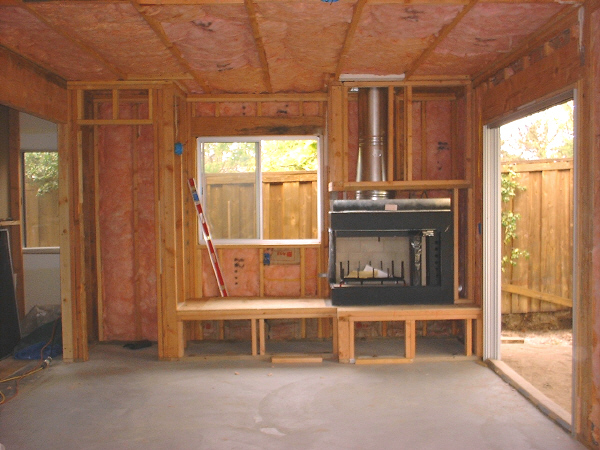
two-sided corner fireplace framed in; note the insulation on walls and ceiling. To the
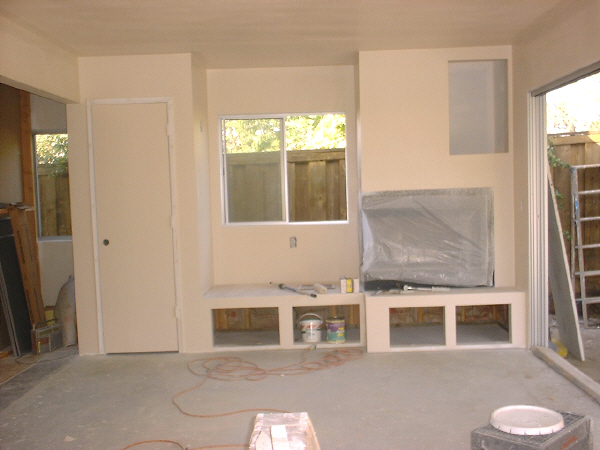
right of the chimney stack will be another cabinet - we hope!
Thursday, July 11: R.W. finishes the roof, then goes to pick up the strip heater
(4-foot, 1,000 watts) and thermostat. Mort and Mike, the electricians, come in the
afternoon to do all the little things called for in the inspection. They explain that they
installed six new circuits in the sub-panel. One for the strip heater, one for the
four-outlet computer receptacle, two for lights and receptacles, and two for the new
four-outlet kitchen receptacle (so we can plug two high-draw appliances side-by-side
without worry). Tomorrow is a pretty big inspection: framing final, electrical, and
insulation!
Friday, July 12: Inspection score: final framing OK, insulation OK, electrical (the one
part R.W. didn’t do himself) not OK. We hear the inspector glanced at the
circuit card that the electrical contractor is supposed to fill out and sign, and said
“this guy’s commercial, right?” Apparently, there are key differences
between commercial paperwork and residential paperwork. So, while the electrical work
itself is fine, the paperwork is improperly filled out. The other issue, is that the
electrician is supposed to perform (and show) electrical calculations to prove that the
amperage is available to power the installed circuits. It appears that Mort has pulled 60
amps to the sub-panel from our 100-amp service, leaving only 40 amps for the rest of the
house. Remember how we sort of thought we’d need a new 200-amp service put in? Well,
we still might. Sigh. In the meantime, R.W. is ready to start putting up sheetrock and
drywall. Today, he drywalled the inside of the closet, single-handedly put up
two panels of sheetrock on the ceiling, and put some wire mesh lath on the outside
walls. For the record, today was our Official Estimated Due Date for our other
addition, a new baby! The baby is running late.
Saturday, July 13: R.W. brings more sheetrock in for the ceiling and other materials,
parking them within the room addition. Then, he puts more wire mesh around the exterior
walls.
Monday, July 15: R.W. finishes wrapping the room addition in mesh,
in preparation to be finished with stucco. He single-handedly puts up all the sheetrock on
the ceiling, and several sheets on the walls. Mort, the electrician, says he left the
energy calculations taped to the breaker box. We can’t find it, and in any case, he
still has to completely fill out the circuit card. The inspector has told R.W. that he
won’t sign off on nailing until the electrical is complete - and now the inspector is
really paying attention to the electrical!
Back to Progress calendar
Tuesday, July 16: R.W. finishes nailing the wire mesh lath on the exterior of the room
addition, then drywalls the interior. Again working by himself, he finishes all the
boarding, and even some of the detail work. That detail work - the trimming, edging,
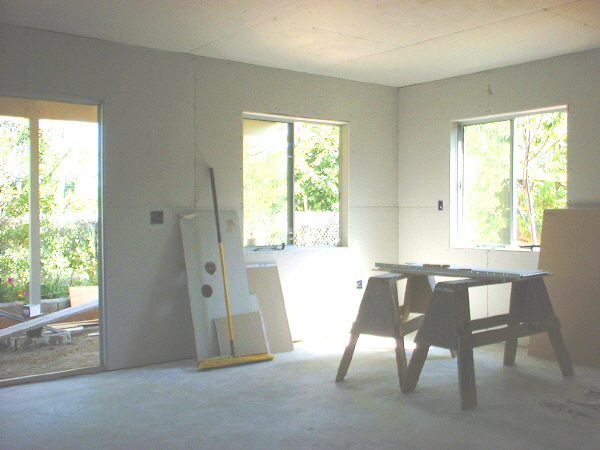
smoothing, taping - will take time. The photo above is looking from our dining area into
what will be Ondine’s office area.
Wednesday, July 17: R.W. does finishing work on the drywall, putting up metal edging
and putting up some plaster. Also, he finishes the inside of a cabinet.
Thursday, July 18: More meticulous detail work, including creating and attaching the faces
of the under-hearth cabinets. Mort seems to have abandoned the job (he’s not
returning R.W.’s phone calls), so a search is on for an electrician to finish the
job. A plasterer, Jim, comes by in the afternoon to provide an estimate on the stucco
work.
Friday, July 19: R.W. calls the inspector, who says he can go ahead and tape the seams,
a bonus since that task usually has to wait until after nailing inspection (which was
being held up by the electrical). So, he starts that tedious job. Jim,
a plasterer, comes by with an estimate, but it’s higher than expected so the
search continues. Tom, an electrician, comes by to estimate finishing up the electrical
work.
Saturday, July 20: More plastering over the taped seams. Our other new addition, Leo
Masaharu Kuraoka, is born this afternoon!
Monday, July 22: More interior plastering. Also, we hear that Tom will be upgrading our
house to 200-amp service. R.W. knocks a hole near our meter box for the new box.
Tuesday, July 23: More interior plastering. Tom, the electrician, arrives to install
the new meter and box. Also, an inspector from SDG&E. Since there is no conduit
installed underground, we need to cut through the sidewalk and dig a trench for the new,
200-amp, connection. Our power is off for most of the day while our new circuit breaker
and meter box is installed.
Wednesday, July 24: In the morning, R.W. works on cutting through the concrete at the
side of the house, in preparation for laying new conduit for the electrical service
upgrade. The concrete is unexpectedly thick, and he decides that he’ll need a
concrete cutter. Finding one is a challenge. For its part, SDG&E faxes planning
information, showing where the existing connections are and where and how they want the
new connections. Meanwhile, we find that our water heater does not work, and call
Tom. Tom comes out, troubleshoots, and repairs the circuit to the water heater. We
turn over the fax from SDG&E to Tom, since he’ll be doing the work. The new
underground connection must run through a new, rigid, conduit. How this new conduit will
tie into the existing steel-pipe service riser is an issue. As the heat of the day builds,
R.W. moves into the addition, prepping the surface for plastering.
Thursday, July 25: Digging up the main electrical service turns out to be a tough
chore. R.W. rents a jackhammer to get through the concrete - and the hard-packed dirt. No
concrete cutters were available. The main service conduit lies 30" below the surface.
Now it’s up to SDG&E to tell R.W. and Tom how they want things connected. We pay
R.W. for the extra charges incurred to date, including the roof turbines, attic stairs,
electrical work to date, fireplace cabinets, and other things we added: it comes to $2,885
which we pay by check.
Friday, July 26: More interior plastering over seams and edges; more electrical work on
the new panel. Inspections scheduled for Monday.
Monday, July 29: Drywall and exterior lath inspections passed. Also, consultation with
the City and SDG&E about the electrical upgrade. An 8-foot copper grounding rod is
driven into the soil and attached to the electrical circuits. More digging in
preparation to lay the new service cables.
Tuesday, July 30: Ditch-digging day. R.W. digs out the main electrical service, nearly
three feet down through rock-hard soil. It is back-breaking work. He uses a small chipping
jackhammer, but the going is slow because the gas line lies directly atop the electrical
conduit, in an orange plastic pipe. It is plastic so it will flex in an
earthquake. The inevitable happens and a small nick opens up a gas leak. SDG&E is
called in to splice the line. There is much bustle, two utility trucks, and several crew
members. Their job finished, they leave and R.W. returns, alone, to the chore of
uncovering the rest of the line, all 23 feet of it, which takes all day. The photo above
also shows the big new electrical panel on the side of the garage.
Wednesday, July 31: R.W. takes his first day off, in order to move. Tom shows up, and
lays the rigid conduit for the electrical service.
Back to Progress calendar
Thursday, August 1: An SDG&E inspector wants the trench dug
nearly a foot and a half deeper (to 4 feet deep), in order to accommodate a curved rigid
conduit coming from the bottom of the hand-hole - the main service junction. Tom talks to
the inspector, who agrees that the entire trench needn’t be 4 feet deep, but the
bottom end of it must be.
Friday, August 2: John’s 40th birthday. R.W. looks at the electrical and decides
to have a conference with the inspector and Tom next week. Meantime, he does more
plastering inside, smoothing over the taped seams of the drywall and edges. Then, he hangs
the closet door.
Saturday, August 3: R.W. shows up with a plasterer, and they do the exterior scratch coat,
the first layer of the stucco. This is a rough, mud-like layer that gets squished behind
the chicken-wire-like mesh. There will be two more layers, a brown coat, then the color
coat.
Monday, August 5: R.W. digs the trench out to nearly 4 feet deep at the “hand
hole,” the main service junction. The photo above is a view from inside the trench,
looking toward the street and hand hole. The garage you see at the top is across the
street. The gray pipe at the top left is the 3” rigid conduit into which will go the
main service electrical wires. You can see a yellow pull-rope coming out of the open end;
this will be used to pull the wires through. Once those wires are through, the rigid
conduit will be lowered to the bottom of the trench, where it will be connected at both
ends. The two big black conduits you see floating mid-way down are the existing electrical
service lines for our house and the house next door. To give a sense of scale, they are
about 30” deep. They emerge from the main box straight out the side; the upgraded
service must emerge from the box at the bottom, hence the deeper hole. The small orange
pipe on the left is the gas service. It is plastic, to flex in an earthquake. It is, as we
found out last week, highly pressurized. After deepening this trench to the required
specifications, R.W. does more finishing work inside the room addition, smoothing over
seams and edges.
Tuesday, August 6: More finishing inside the room addition, and also on the bedroom
wall.
Wednesday, August 7: SDG&E trench inspection - it is OK to go on to the next step,
which is to backfill some of the trench with shade sand (nothing larger than 6 inches)
which will surround the new conduit and gas line. R.W. confers with Tom (the
electrician) and SDG&E over the phone. Then, more detailing inside the room addition,
preparing the walls for the coat of texture. Payment #3 (framing) is made, for $5,500.
Thursday, August 8: Some backfilling of the center portion of the now-approved trench
with shade sand. More interior detailing, including installing the pocket door between the
room addition and our existing master bedroom. R.W. has chosen a solid door, for better
noise reduction. A side benefit of the solid pocket door is that its weight tends to keep
it on its tracks.
Friday, August 9: In the morning, there’s a conference between R.W. and the
inspector from SDG&E. Our electrical disconnect/reconnect is scheduled for next
Wednesday. We will likely be without power for most of the day. Then, R.W. applies the
sprayed-on texture to the walls, matching our existing tract-home sprayed-on texture.
Saturday, August 10: Prepping and priming the interior. Tom, the electrician, calls -
our disconnect/reconnect has been rescheduled for Thursday by SDG&E - that’s
the earliest they can get to us.
Monday, August 12: Another coat of primer goes on the room addition interior walls,
including inside the cabinets and closet.
Tuesday, August 13: First coat of paint throughout the interior, in the bedroom and the
room addition. Trim prepped and added around doors. Doors painted.
Wednesday, August 14: More painting and touch-ups (“holidays,” R.W. calls
them). We discuss flooring, fixtures, and finishing touches. We make payment #4 for
$4,500.
Thursday, August 15: A big day - the electrical
disconnect/reconnect. While R.W. paints, Tom is here making the final connections and
coordinating with the City and SDG&E for our new 200-amp service. We are probably the
only house in the neighborhood with 200-amp service, which we desperately need what with
two home offices. Since the power will be off, possibly all day, we leave town for the
weekend.
Sunday, August 18: We return home from a long weekend visiting John’s Mom, near
L.A. We walk in and WOW. In our absence, R.W. was very busy. The
temporary wall is gone, the acoustical ceiling in the dining room is now textured and
painted to match the rest of the house, the walls are textured and painted, and everything
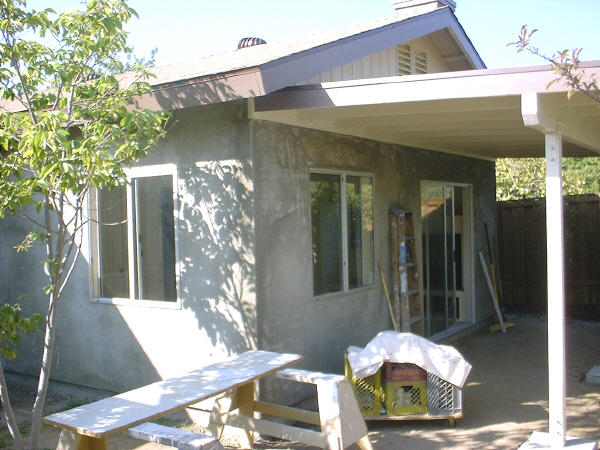
is cleaned up and sparkling. The new sliding glass door to the patio area has been
installed. The new room feels like part of the house now. We are immediately happy that
the room addition is large enough that you can’t see the whole room from the kitchen.
The larger opening was the right choice, too. We love everything about it, and have our
first meal in our new room, a frozen pizza. Our bedroom is finished, too, with a sliding
door connecting it to the new room addition (which we enjoy going in and out of, like
little kids). Outside, the brown coat has been applied - the second of three layers of
stucco. Next will come the color coat. The electrical trench has been covered, and all
necessary approvals and sign-offs have been obtained. Judging from an old electric clock,
it appears that the power was off for less than three hours.
Monday, August 19: R.W. forms the bit of concrete patch on the sidewalk, which had to
be torn up to lay the new electrical service. Then, more touch-ups inside.
Tuesday, August 20: The concrete patch is poured. We discuss the patio concrete, which
will extend three feet on either side of the new room addition. Then, R.W. sets to work
installing the pull-down attic ladder. Too late, we realize that we should have had some
additional phone lines pulled in while we had the chance!
Wednesday, August 21: Trim work - the fireplace is touched up, then trim is added around
it. The pull-down attic ladder is finished, and a second coat of paint is applied. Then,
it too is trimmed out with decorative moulding. The photos above look as if we painted the
room different colors - it’s a trick of the light. Everything is a sort of eggshell
white semi-gloss. The photo above left shows the second of three layers of exterior
stucco, called the “brown coat.” The photo at center shows the view from our
existing dining room into the room addition. On the left you see the closet, hearth bench,
and fireplace leading to the sliding glass patio door. The hole in the ceiling is for a
ceiling fan with lights. The photo above right shows the opposite corner, with a new
sliding door leading to our master bedroom. This is the door that will likely be covered
by a bookcase for the next 20 years. You can see the pull-cord for the attic ladder. The
hole in the ceiling is for a hard-wired smoke detector, which is a current requirement (no
battery-powered units are permitted in new construction).
Thursday, August 22: R.W. digs out the an area in preparation for the new patio slab
concrete pour. The new patio slab will extend three feet to either side of the patio
canopy and room addition. Also, some sanding and paint detail work inside the room
addition. The screens are installed for the windows and sliding patio door.
Friday, August 23: Forms built for the patio slab and surrounding concrete apron.
Monday, August 26: Laying of steel mesh to reinforce the concrete slab.
Tuesday, August 27: Fine-tuning the forms for the concrete pour.
Wednesday, August 28: Final layer of stucco: the “color coat.” It
matches amazingly well, and blends the new addition with the older part of the house
better than we had hoped. We discuss the height of the shelves we want in the closet, and
decide on about 16 inches between shelves - just enough for a Rubbermaid box that
won’t be too heavy when filled with stuff.
Thursday, August 29: R.W. crafts and mounts the doors for the hearth cabinets. They are
nicer than any other cabinet doors we have in the house.
Friday, August 30: The concrete pour. R.W. and the crew is here bright and early to
adjust forms and prepare. The pump trailer is positioned in the street in front of our
driveway. The big cement mixer truck comes a bit later and the pour begins. This patio
slab replaces the old patio slab, which is now under the new room addition. The new patio
will be smaller than the old one, though.
Saturday, August 31: The photo above shows the new concrete patio slab. It is smaller than
the patio it replaces, and we worried that it would be too small. Now, looking at it, it
seems fine - just a bit tight at the far end. R.W. shows up to hose it down (the wetter
the concrete stays, the harder it will cure), then paints the cabinet doors. We discuss
having him level the interior slab in preparation for us laying down laminate flooring.
Back to Progress calendar
Monday, September 1: Labor Day. R.W. shows up to wet down the
slab again, then puts a second coat of paint on the cabinet doors. He also figures out
what he will need to create the shelves we want in the closet and cabinet.
Tuesday, September 3: Outside, some expansion slits are cut into the patio slab and
sidewalk using a concrete saw. Inside, R.W. builds the shelf supports in the closet and
large cabinet. Then, more detail work: sanding and painting the cabinet doors again.
Wednesday, September 4: Finishing the shelves. They are wonderfully crafted shelves,
with a bit of ledger at the front to add support and polish. Then, R.W. starts leveling
the floor, using Fix-All and a long level. That will prepare it for the flooring (which we
will install).
Thursday, September 5: R.W. continues to level the floor using Fix-All. It is a race
with the Fix-All because it sets up in ten minutes, leaving very little time to work. We
buy the electrical fixtures at Home Depot: a ceiling fan with lights and a double reading
light, a ceiling light for the dining area, four inexpensive exterior “jelly
jar” lights for the covered patio and walkway, and an exterior floodlight for
the back yard. The total comes to $183.91. When we return, we realize that R.W. has taken
his tools home - suddenly the back yard looks bare.
Friday, September 6: The fireplace guy came to install the fireplace glass.
Monday, September 9: R.W. comes by to do some small detailing and see what remains to
be done. He makes a run for materials and tools.
Tuesday, September 10: R.W. is here, along with Tom, the electrician. R.W. does some
finishing work on a flower bed, then helps Tom install lights. Tom installs the strip
heater, thermostat, dining room light, fan, and rigs a switch on a reading light fixture.
John makes a run to Home Depot to get deeper “jelly jars” for the exterior
lights, because the standard glass ones won’t accommodate a compact fluorescent
bulb. Tonight, we turn on the lights in the addition for the first time. We are very
pleased with our choices: a four-light ceiling fan (into which we put four 15-watt compact
fluorescent bulbs), a two-light reading light over the hearth (2 20-watt compact
fluorescent bulbs), a ceiling fixture in the dining room (3 20-watt compact fluorescent
bulbs), four exterior lights (1 20-watt compact fluorescent each), and one exterior
floodlight (1 100-watt mercury vapor bulb). The lighting pattern under the patio and along
the sides of the house is perfect.
Wednesday, September 11: Final inspection. The inspector catches two minor things: some
extra insulation around the fireplace chimney tube, and the need to put a fire-proof
covering on the hearth. R.W. leaves to get tile and some Masonite boards. We took our
Fo’d truck to Lowe’s to buy our floor covering: 25 boxes of Armstrong SwiftLock
laminate in “Salem Pine” finish. This product installs without glue, although
we’ll use glue in the kitchen area, and carries a 25-year warranty. Each box was
about $51, or roughly $2.50/square foot. We also bought QuietWalk 3-in-1 underlayment
instead of the Armstrong 2-in-1 underlayment. The 2-in-1 underlayment provides a vapor
barrier and thin cushioning, where the 3-in-1 QuietWalk product provides a vapor
barrier, denser cushioning, and sound deadening. The QuietWalk, at $40 for a roll of 100
square feet, is twice the price of the Armstrong product. But, because John works out of
the house we figured the added $100 or so was a wise investment in keeping the noise down.
The total after taxes, installation tools, and odds and ends, is around $3.60/square foot
NOT counting baseboards and trim, and we have about 500 square feet to do (the addition
plus the dining area and kitchen).
Thursday, September 12: R.W. starts on the tile hearth. He has found some tile, and
after a dry-fit, gets them cut, then comes back and sets them. They need to cure for 48
hours before grouting. We discuss the floor with him, and figure out solutions for a few
high spots. He’ll have to plane the bottom of the pocket door, unfortunately. He does
more leveling work on the floor where the two slabs join. As for us, we have one box of
the laminate strips laid out. John goes to Lowe’s to return one box of flooring
(inexplicably marked with a 15-year warranty instead of 25), and buy two more, plus pick
up all our baseboard mouldings. He is shocked to learn that the matching baseboards cost
$10 per 7-foot length! At that price, the baseboards alone would cost $150, not counting
the expensive bits of trim for the doors. He buys the door trim ($18 and $27,
respectively, for 7-foot lengths), but gets cheap quarter-round baseboards ($3 per
8-footer or $4 per 12-footer), which we’ll paint. He also buys a roll of the thinner
Armstrong 2-in-1 underlayment, in case we need a little extra padding to level out where
the two slabs join. The total comes to nearly $300, and several of the 12-footers splinter
in the wind on the drive home. We’re pretty sure we still have enough, though. That
brings the total cost of the flooring to about $3.80/square foot.
Friday, September 13: Trimming out the front of the tile hearth. We select a grout
color: alabaster. Another inspection is scheduled for Monday.
Saturday, September 14: Grout day for the tile hearth. Also, cutting the trim for the
back part. We discuss dealing with the threshold of the pocket door (which has a high spot
in the slab where an anchor bolt tied the old wall to the foundation). Grinding the slab
might do the trick. We make payment #5, for $5,000.
Monday, September 16: Final inspection
completed! The tile and grout then gets its first coat of sealer. Lots of small
touch-ups today, too.
Tuesday, September 17: Trimming out the back of the tile hearth, and filing down the high
spot under the pocket door. The photo above shows the finished hearth, with tile and
moulding all the way around.
Wednesday, September 18: The telephone jack in the room addition is connected, by
splicing into a non-working telephone jack in a bedroom. The happy side effect, is that
the non-working jack now works too. At this point, everything is pretty much finished
except the floors, which is our job.
Thursday, September 19: In the evening, we went to look at area rugs at Bijanz, a shop
in Grossmont Center that is going out of business. We found not just one, but three
rugs we really liked, all marked down, with an additional percentage off the marked-down
price. Two were 8’ x 11’ Oriental-style rugs (machine-made in Turkey out of a
synthetic) marked down to $595 (less 30%), and one was a 5’ x 8’ Oriental-style
rug (machine-made in Belgium from a lightweight faux silk) marked down to $149 (less 35%).
After some negotiation, we bought all three area rugs for $930 even, including sales tax.
One large rug (blues and browns) will go in the room addition. One large rug (reds and
browns) will go in the living room after we re-do the floor there. The smaller lightweight
rug (blue and cream) will be a wall hanging in the living room.
Saturday, September 21: We start installing the floor in the addition. It is an
Armstrong SwiftLock laminate in “Salem Pine” finish, with a 25-year warranty
from Lowe’s. John figures that it would require the least amount of rip-sawing
lengths of planks, if we started in the kitchen instead of in the addition. Unfortunately,
that wall is slightly bowed due to age, so we start along the cabinets in the addition and
backtrack into the kitchen. Barbara and Bill come over to help. John and Bill learn that
our new circular saw blade, designed for laminate floors, doesn’t cut very well;
cutting is quicker and easier with a hand saw. We use a coping saw for the one notch we
cut. Then, we roll out the QuietWalk underlayment and start. We come across one hitch
which we solve by undercutting all the door jambs. Then, we backfill the kitchen corner
and snug everything up tight. It looks good! Bill and John continue clicking and locking
and cutting and soon lay a good section of floor. Ondine lays some flooring, and completes
a stair-stepped section up to the dishwasher. We plan to check the clearance around the
dishwasher first thing in the morning, then keep laying floor.
Sunday, September 22: Barbara and Bill came over and we find that the dishwasher will
not come out over the height of the laminate floor. We cut off one of the
dishwasher’s leveling feet with a hacksaw to get it out, turn off the mains, and
carefully disconnect the hoses and wires and pull it out. John goes to Home Depot looking
for a cabinet or plywood to make a cabinet, but instead finds an unusual dishwasher made
by General Electric. It is designed to fit under a funky little studio-apartment sink, and
has a full-sized door but a compact, L-shaped interior. Because the washing compartment is
significantly shorter, we can wiggle it in over the laminate. It is a special order item
that had been returned, so it’s on clearance for $199 (regularly $409). He buys it,
brings it home, then learns that we need an additional fitting requiring another trip to
Home Depot. We attach the hoses, turn off the mains, and carefully re-connect the power.
It makes noise, so we figure it’s hooked up correctly and nudge it into place. Then
we find out it doesn’t work! It makes noise, but that’s all! Sigh. Theory #1:
the wires coming out of our wall are so old, they’re not color-coded the same as the
dishwasher wires. Theory #2: our kitchen water pressure is inadequate. Theory #3: whoever
special-ordered the dishwasher from Home Depot returned it because it didn’t work
for them, either.
Monday, September 23: We call Tom Boehm, our electrician, and set up a time for him to
look at the dishwasher and install a plug for our range. Then, we continue laying the
floor. R.W. comes by to pick up payment #6 for $5,000. We give him a present: a poster
from the Rockingham 500 auto race in Rockingham, England. He seems surprised and truly
pleased.
Tuesday, September 24: Ondine and John continue laying laminate floor planks. It is very
hot and humid. The photo above shows the partially finished floor, looking into the room
addition from the dining area. The blue layer is the 3-in-1 QuietWalk underlayment. The
little black things around the perimeter are spacers, to maintain a relatively even
expansion space between the floor boards and the wall.
Wednesday, September 25: Tom, our electrician, comes. It turns out that our stove already
has a plug! Also, he checks our dishwasher. “Who installed this?” he asks. John
confesses that it was a DIY project between him, Barbara, and Bill. “Well, you did a
good job,” Tom replies. “Nothing wrong with the installation. It’s the
dishwasher that’s bad.” So, good news/bad news. The good news: we can install a
dishwasher! The bad news: this one has to go back! Another bad news item: we realize that
we’re not supposed to be installing the floor with humidity over 65%. So, we stop all
work on the floor until the humidity drops back down. The photo above shows the layers of
flooring in the kitchen: the Armstrong SwiftLock laminate over the QuietWalk underlayment
over the old linoleum (which is over even older linoleum).
Thursday, September 26: Ondine calls Lowe’s to see if we can continue laying the
floor despite the humidity. For what it’s worth, Lowe’s own installers were
installing floors over the last several days, despite the humidity. Bill and John return
the dishwasher to Home Depot for a refund. We sold our truck today, so we use Bill’s
Ford Explorer. We buy a piece of particle board to cover up the dishwasher hole, and
consider crafting a cabinet.
Saturday, September 28: We start in again on the floor, and complete the entire room
addition! It is easier slicing the widths down than we had anticipated. The floor looks
great. Now all we have to do, is baseboards.
Sunday, September 29: We move the stove and refrigerator to lay the kitchen floor. That
turns out to be a difficult task, and we rent an appliance dolly to move them onto the
living room carpet. We complete the kitchen - except for the final strip by the wall,
which needs to be sliced lengthwise - at about midnight.
Back to Progress calendar
Saturday, October 5: We finish the last little strip, so our
floor is now finished! We tighten up the whole floor - installing in the humid weather two
weeks ago meant the planks shrunks slightly, leaving minute gaps which we closed up. We
also consider what to do in the closets, and start thinking about the baseboards.
Wednesday, October 9: John’s Mom, Frances, comes to visit and paints the
baseboards.
Thursday, October 10: Frances sands the baseboards and fills in a few holey spots.
Then, she gives them a second coat of paint. John does some caulking.
Saturday, October 12: John caulks the perimeter of the room addition, then installs
some baseboards.
Monday, October 14: More work on the baseboards. Then, we move furniture back into the
kitchen: the dining table, chairs, two bookcases, and a desk. That frees up the room
addition for the new rug. Just a few more baseboards to go!
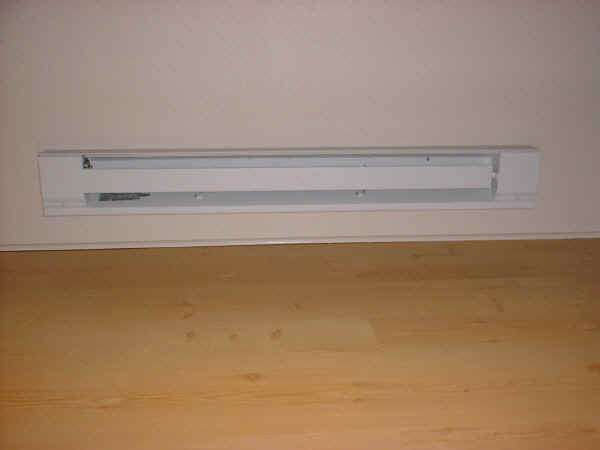
Wednesday, October 16: More baseboards and detail work. The photo above, by the way, shows
the new electric strip heater in the room addition - the cause of all the delays and
additional paperwork earlier in the project. It works. But it’ll never be turned on.
Friday, October 18: Our first fire in the fireplace - enjoying our completed room! Yay!
That about wraps it up for this journal. We will point out a few things. First, we are
very happy with the addition, and absolutely every decision we made along the way, which
is a real rarity. Among our wiser choices, we think: we went with standard anodized
aluminum window frames instead of vinyl. Anodized aluminum lasts longer in the kind of
weather we have, is more expensive to build but cheaper to buy, and, most-important,
matches all our other windows so we didn’t have the expense of replacing perfectly
good existing windows. We had a sliding pocket door installed between the master bedroom
and the addition: we’re already using this door for quite a bit of nocturnal traffic.
We opted to spend an extra hundred bucks to get the heavier QuietWalk underlayment to dull
the various thuds of an active toddler - since John works out of the house this has been a
prudent investment, plus it gives the Armstrong SwiftLock laminate floor a very wood-like
spring. We paid extra for the closet and cabinets, already in use. Even the bit of
sidewalk by the side of the house has proven handy for keeping our shoes clean when taking
out the recyclables. No regrets! That’s an unusual thing for a room addition.
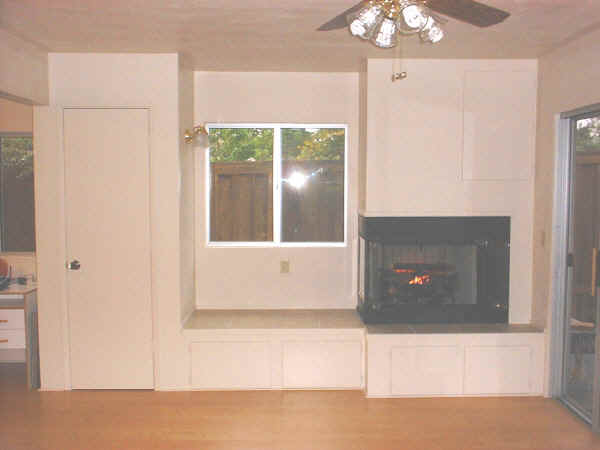
Current and FINAL
Friday, November 8: We make the last payment to R.W., for $2,074 (check #5324). He brings
with him an addition-warming present: a framed poster from the Formula One U.S. Grand Prix
on September 29, which he just attended. He painted the frame blue, to accent our yellow
kitchen and bring out the blues in the poster. It looks great in our lovely new room!
EPILOG
Saturday, November 9: John returns some leftover odds and ends to Lowe’s for a
full refund. He also brings his receipts, since the Armstrong SwiftLock is now advertised
at $1.98/square foot (we paid $2.47). Lowe’s refunds the price difference, which
totals about $300 including sales tax. We are very happy - with our room addition, with
our laminate floor, and with Lowe’s. What with two kids, moving stuff into the new
room addition will take a while. We’re working on it slowly but surely, and hope to
get Ondine’s office desk moved in next week.
Back to Progress calendar
Back to top
Our room addition: a description
Our house (pre-addition) is a typical four-bedroom, single-story tract
home, built in the early 1970s, in an area of suburban San Diego, California. It is about
1,225 square feet. We love the location; very few houses in the neighborhood have as nice
a view out the front window as ours, and Ondine grew up in the neighborhood (next door, in
fact). John works at home, so one bedroom is his office. Ondine uses one bedroom as her
office. That leaves two bedrooms for a family of four.
The room addition is not just about having a bedroom for each child and
office space for Ondine; it’s also about shifting some activity from the living room
(adjacent to John’s office) to the back of the house.
Our rough plan went through several versions, each time getting simpler
and less costly. It began as a two-story dream addition in the back of the house (a common
addition on this floorplan), then became a single-story addition with an office, den, and
half-bathroom. Many revisions later, it came down to a single-story, 20’ x 12’
room in back, essentially replacing an existing covered patio. The plans call for a pocket
door into the master bedroom and a large opening into the dining room. In addition, a new
patio will be built, smaller than the old one, but to make it the same size or larger
would have cut our grass and trees area down to nothing. This seemed to be the best
balance of minimum needs, priorities, room size, cost, and back yard space preservation.
Although the house will remain a four-bedroom house, the square footage will go from 1,225
square feet to 1,465 square feet, almost a 20% increase.
The single large room addition will contain Ondine’s office space (her current
office will become Leo’s bedroom) and a family room-type space with a wood-burning
fireplace. A sliding glass door will open onto the new covered patio in the back yard.
Whatever floor covering we choose for the addition will continue through our existing
kitchen.
As the scope has crept downward, the budget has crept upward. Some early estimates
turned out to be lowballs – you need approved plans in hand to get an accurate
estimate. The current estimate, based on the plans, is about $31,500 not including the
possibility that we might need a whole-house electrical upgrade (another $1,800). This is
about $10,000 more than the estimates made without plans. To put the cost in perspective,
however, consider that $31,500 gets us nearly 20% more space, but would be only a 10%
down payment on a comparable house in this neighborhood. The median price of a home in San
Diego passed the $315,000 mark as we began this project in April 2002. As of August 2002,
the median price of a home increased to $330,000.
Five things about this addition added cost and complexity:
First, the roof is peaked, with a “California fill” (a cosmetic,
non-structural peaked roof) spanning a section of existing flat roof over our dining room
and part of our master bedroom. This meant construction of a section of new roof equal to
about two-thirds of the existing peaked roof.
Second, a window in the master bedroom had to be moved to make room for the
addition wall and the doorway we want between the master bedroom and addition. This
required demolishing most of the back wall of the house. We originally thought that the
door would remain closed and possibly covered by furniture until the kids grow up and move
out (we’re talking about a 20-plus year plan here). But, the door is just too handy,
and we use it all the time.
Third, we wanted to preserve some view corridors from inside the house,
particularly from the kitchen into the back yard. That meant large windows, shoved as far
into one corner as possible.
Fourth, we wanted a wood-burning fireplace that is elevated (for infant safety),
with the hearth running into a sort of window seat. The window seat runs into the
addition’s only built-in closet, which will have shelves for storage. Under the
window seat is additional much-needed storage.
Fifth, we wanted the cheapest electric heater, baseboard resistance-heat units,
since we never use the heat in our house. This triggered a whole series of events, leading
to a more-expensive permitting process, a whole-house electrical upgrade, and long delays
because the documentation necessary to approve this is essentially the same as it would
take to build an entire house. It was a very expensive way to save money, and unless you
have allergies that might be aggravated by a forced-air system, we would recommend that
you not do this.
Back to top
Back to the Kuraoka Family homepage